Showing posts with label Crafts. Show all posts

Friday, January 17, 2014

Patriotic Buddy Poppy Wreath for Veteran's Day

Patriotic DIY Buddy Poppy Wreath
Due to the chaos/mess of the holidays, I didn't get this posted when I wanted. My soon-to-be sister-in-law asked for my help decorating the the local VFW's float for the Veteran's Day parade. I wish I can could claim the idea on this one but it was all hers. And it turned out to be a good one!
VFW Buddy Poppies
She was given a full box of Buddy Poppies to play with. And that we did. We pulled the tags off each one and left the wire stem. Then we simply stuck the stem into the foam wreath. She wanted red, white, and blue theme colors, so we attached a white and blue deco mesh bow to the bottom to take the Christmas-y look away from it.

Aside from the poppies blending together too much, I say it turned out cute! She was very pleased with the results. And here is one on the float! 
buddy poppy wreath on float

We had a lot of trouble finding the foam wreaths. At the time, they were out of stock everywhere. I wanted to get a larger one but we went with what we had. We also painted the signs with silver, red, and blue. We worked HARD on those! But I really have to give all the credit to my sister-in-law-to-be.  :)


Tuesday, September 24, 2013

DIY Hello Kitty Key Cover


I was told that I needed to blog more, so here is a quickie :P

We bought a used Durango last December and the one and only key didn't have a ring/clasp and the buttons were missing. That's my luck. But the vehicle had AC and living in 100+ degree weather 8 months out of the year (exaggeration) I didn't much care about the condition of the key. 

My husband globbed some kind of industrial glue to the back of it and stuck a ring on it because he liked it I guess (see what I did there.) It lasted for a few months, then the glue started to crack and then the ring fell off. So here I am trying to keep up with a loose key along with my other keys! And I am the type of person that is always losing my keys. So it's a pain in the butt but I still kept putting off a fix. Until I nearly dropped the stupid thing down a storm drain the other day! So it was time to do something, so I made my own case in a very small amount of time while sitting next to my kiddo while he played on the Xbox.

So here it is. Dang that thing is a big piece o'crap.


And here are the materials I scrounged up:


First thing I did was made the tiniest, tiniest hole in the center of the felt square:

Now trim a little itty-bitty snippet off that corner to make your key slot.


I trimmed a little bit off felt off the sides and top of the flaps and stitched them together.


For Hello Kitty's Face, I cut out an oval from white scrap felt. Then I cut out a bow and then hot glued them to the case. If you can tell from the first picture, I also hot glued two strips of felt the the sides of the case for reinforcement and to cover up my crappy stitching job. Then I took a fine point sharpie and drew the face. and TA-DA! The felt may be a weak fabric to use, but it will hold me over for now. 

Wednesday, May 30, 2012

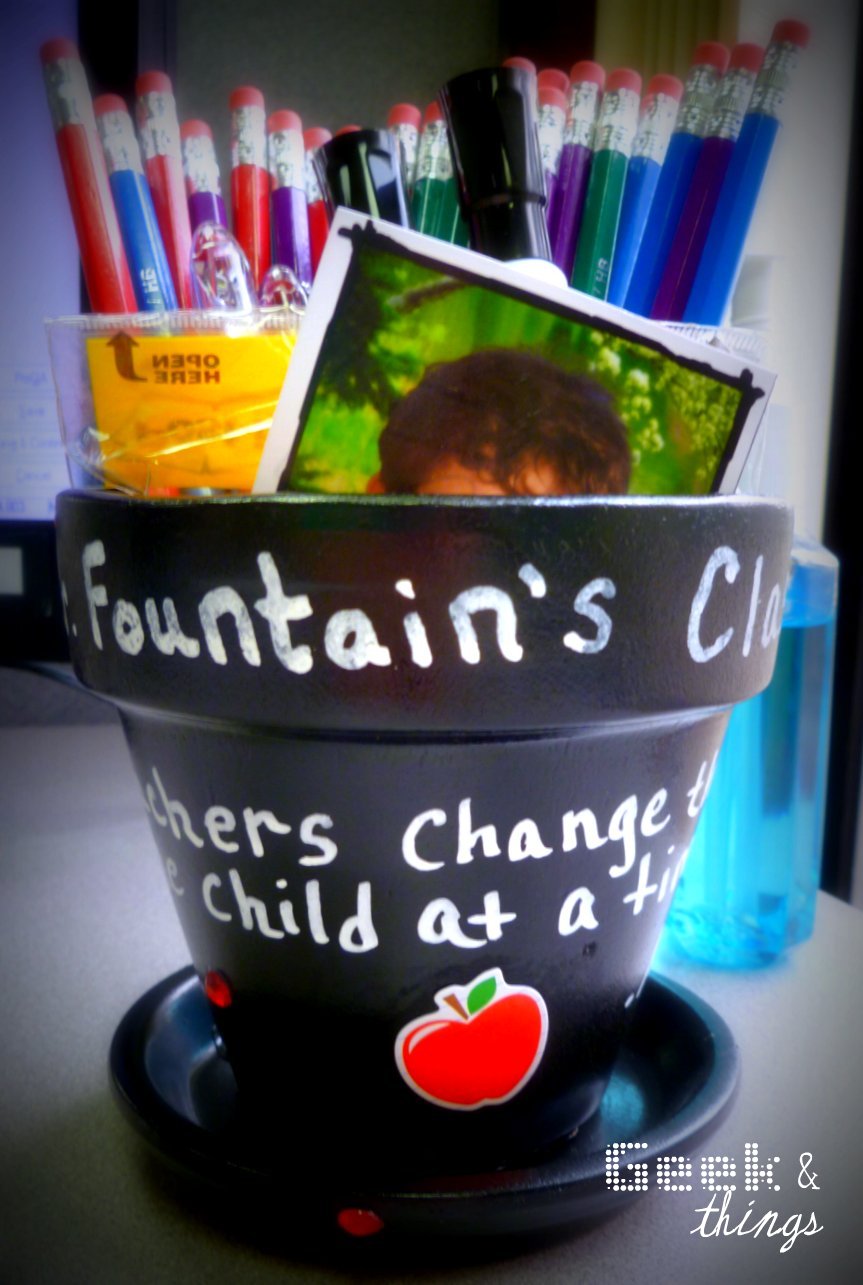
DIY Version of a "Little Pot for Thought" Teacher Gift


My kiddo has had a wonderful teacher this year. He has taught my son so many great things and showed compassion, concern, knowledge, and awareness about his food allergies. We wanted to show our appreciation with a thoughtful little gift to present to him at the End of the Year Classroom party.

I racked my brain on what to give him. I reached out to friends and google searched like crazy. Received a lot of great ideas, but I kept going back to this "Little Pot for Thought." It was just so cute! And the quote was perfect!


"Teachers change the world, one child at a time"  --Anon.
Well, if you clicked the link then I am sure you might have seen the price. It's a bit out of my budget and that doesn't include shipping charges. I was also on a very short time frame so I did not have time to wait. I thought, "That would be so nice stuffed with school supplies. And the pot would be so easy to make." That sealed the deal. So I went out and bought the supplies.


- COSTS -
Found the 4" pot terra cotta pot at Wal-mart for .78 cents. The matching saucer was .75 cents (why they charge separate for those is beyond me!) I went with Krylon Duo Paint + Primer in one, a glossy black, which cost 4.94.  We needed a mismatch box of acrylic gems anyway, and we found one that had little red ones just like the "little pot for thought." That cost $4.97. Then I purchased a white paint pen at Hobby Lobby for $2+change along with a 40% off coupon. I should have bought a smaller tipped paint pen, I was a total noob at it and the letters turned out HUGE. But anyway, I already had the rest of the materials, so it cost me less than $14. Even lesser if you figure the cost of the actual gems used. I had money left over to buy some supplies I knew he used for fillers: pencils, dry erase markers, red pens, and some post-it notes. The kiddo also wanted to leave a little something extra special in there for his teacher, so he tucked in a Spring school photo of himself.



Here is a close-up of the acrylic gemstones. Tacky Glue hadn't completely dried yet, so you can see a bit of white around the edges.


I added a little bit of personal touch by writing his teacher's name on the top rim. The kiddo also signed the back of the pot with a drawing of a heart with love (not pictured). Children can be so sweet. :)


- TIPS -
I used a fine sand paper to smooth out sharp and rough edges of the terra cotta pot before I painted it. I also used tacky glue for the acrylic gems, E6000 to permanently glue the pot and the bottom dish together, an apple sticker for decoration, and then sprayed the finished project with Mod Podge spray sealant. I recommend the glossy sealant if you are using the gloss spray paint. 

Sunday, May 13, 2012

Happy Mother's Day! DIY Picture Tile Gift

Happy Mommy's day to all the hardworking ladies out there! Today I wanted to share a project that I made for my Mom; I hope she will like it. It was inspired by theaudreys.blogspot.com --such a neat idea! The photo I used was taken by a friend of mine earlier this year and my Mom had mentioned how much she loved it. So I decided to roll with this project and I think the results are lovely.

I added a few extras to my version: I made the ribbon and bow a permanent fixture and I hot glued some felt to the back with a "Happy Mother's Day" label. The tile is a smooth 6x6, 80 cent tile from Home Depot. I used Mod Podge to apply a pretty pink piece of Scrapbook paper. While that dried, I ordered a 5x7 1-hour photo from Wal-Mart and trimmed it down to a 5x5 (ish). Then I sprayed the back of my photo with spray glue adhesive and attached it carefully. At first I tried using a photo from my ink jet printer, but it was a very bad idea. Long story short, I made such a bad mess that I ended up scraping the project and starting over. It's a good thing Mod Podge is so forgiving!

 Let me know what you think!

Tuesday, February 14, 2012

Skyrim Themed "Arrow In The Heart" Valentine Scroll

Skyrim Arrow to the Heart Valentine DIY color printed on fabric with Muslin and ink jet printer
 Yes the whole “arrow to the knee” phrase/joke is overused, but Oxboxer over at Tumblr made several super-cute Skyrim themed Valentine cards and I fell in love with them! This one in particular is perfect for my husband. We've used the phrase so much that it's completely replaced the name of the game that you just lost by the way). We rarely mention or hear the word "Skyrim.

And yeah, I nerded the Valentine up to another level. I didn't want to simply print it on some dumb piece of boring paper and have it laying about the house or tossed in with the bills. I wanted it to be extra dorky special! Plus I was dying to try this new technique I discovered on the wonderful world of Pinterest from The Country Chic Cottage blog: transferring images on fabric using an ink jet printer. So I grabbed some spray adhesive, muslin, and card stock and started playing.
  using an ink jet printer to put images on fabric 
I ironed the muslin so that there were no wrinkles (unless you are going for the rough, imperfect look, then it turns out nicely). Then I lightly spray glued to the card stock and placed the muslin on top. After I smoothed out the fabric to get rid of wrinkles and bubbles, the excess fabric was trimmed off the edges of the card stock. Then the card+muslin was placed in my ink jet printer, ready to be tested (that's when the DIY Dork in me got really excited)! I was uncertain how colored images would turn out seeing how the tutorial I learned from only used gray scale, but the results ended up being really cool! I am in love with this technique! Can't wait to use it on Halloween!

The original dark pink color in the upper text of the original artwork didn't show up well on the the muslin. The words blended in with the background and made it difficult to read. I had to brighten the font color and reprint. Good thing muslin is cheap!
Printing a Valentine on fabric using an ink jet printer, Removing the muslin from the Card stock
After I let the ink dry for a bit, I sprayed a few light layers of Mod Podge Matte Clear Acrylic Sealer and let that dry, too. Then I gently peeled the muslin off the card stock and it came off so easily! NEAT-O!
Sewing the muslin with the printed image to burlap back peice
The muslin was sewn to the burlap using a regular straight stitch and then a tight zig-zag stitch around the edge of the burlap to keep the darn stuff from shedding. Hopefully this will hold!
Skyrim Arrow to the Heart DIY Valentine    use fray check to seal the edges of the hole-punched fabric
I had some hot pink twine and fabric hearts just lying around so I decided to finally put them to use. I punched a hole in the heart and dabbed the edges with Dritz Fray Check. Then rolled up the burlap, wrapped it with the twine, slipped on the heart, and tied a bow.

And now I have a sweet Valentine made with love!
DIY Valentine Scroll Sealed with a heart

Friday, February 10, 2012

Stupid Easy: How To Make a Fun Flower Pen


These are so easy that it took me 5 minutes to make this one, pictures and all. It's taking me longer to write this blog! They are so inexpensive, really cute, and the creative possibilities are endless. These have seen in many offices, even my own. I also made a few for my Scentsy parties and they always get some kind of compliment because they are a lot of fun. They are a great for  baby showers, weddings, or any kind of social event. But I keep them around just for personal use. And they make great journal companions. :)

Here is all you need:
  • A pen.
  • Floral tape (they come in many colors but the most common you will find is green. This can be found at Wal-Mart, Hobby Lobby, Michaels, or any other craft store).
  • An artificial flower of your choice (or two flowers, or feathers, or anything with a long slim stem. If it doesn't have a stem, then you might want to grab some floral wire as well).


First thing you want to do is take the cap off the pen (if it has one). Then align the stem along side the pen like so:  

You want your stem long enough to be able to stay put, a short stem is harder to work with. But if your stem is longer than your pen, trim it down with a wire cutter.

Now, Try to get the flower bit as close to the end of the pen as possible. Then start wrapping your floral tape snugly around the stem and the pen. If you pull the tape too tight, it will  easily rip. I like my starting wrap to go around at least 2 or 3 times. 


Once the tape is secured well, I like to cover the end of the pen and wrap as close to the flower part as much as possible. It holds the flower on better, too. 

See how the tape in the next photo is somewhat starting to go up the flower part? After that, go ahead and just start twisting the pen while guiding tape around the entire length of the pen.


Stop right about the place as shown below. You could probably take it further, but just make sure you wrap past the end of the stem a good ways:


Then start going back up the pen to about halfway. Again, this is just to secure it better. 


At about halfway, just rip the tape off from the roll and then smooth it out on the pen.

Now you have a fun flower pen!
Photos by Lainy @ Geek & things


Repurpose a toothbrush holder and decorate with some scrapbook stickers for a cute pen-holder. Happy toothbrush holder is happy!