Wednesday, February 19, 2014

Frozen Buttercream Transfer Resource Page to make Awesome DIY Homemade Cakes for any Occasion!

DIY frozen buttercream Transfer FBCT Cakes

I'm not a cake expert, I'm just a busy mom with a full-time job trying to make homemade custom "awesomeness" for my family. So don't expect to see cake perfection here.! The main reason I make homemade custom cakes is because my son has food allergies. I don't have the luxury of running to the local bakery for a child's birthday cake, so homemade is what it has to be for most of our special occasions. I had to find a simple solution for birthday celebrations and that's when I stumbled upon frozen buttercream transfers. The are safe, yummy, fun and easy to do, and the designs are endless!


Here is a list of my favorite resources that helped me learn how to make Frozen Buttercream Transfers for homemade cakes.

A wonderful step-by-step tutorial (complete with wonderful pictures) on Cake Central.


Great video by Kerry's Kakes that shows the motions (no words, just awesome ).

A video by Wiltoncakedecorating that take you through the process from start to finish. I couldn't help but laugh every time she said "wax," but it is a great tutorial.

"How to decorate a cake - Easy Cake Decorating Ideas and Tips" from BettyCrockerTV. This is what helped me learn how to work with icing.


My cakes. Not perfect, but fun enough!
  
Sonic the Hedgehog cake
for my son's 5th birthday.

My first
Frozen Buttercream Transfer
 Experiement.

Oilers Cake for my hubby.

Wednesday, February 12, 2014

Dollar Store Valentine Themed Gift Bucket

Great for teachers gifts!
Inspiration for this came from my kiddo's GT fundraiser this past Christmas. They were raffling over 60 different kinds of themed baskets, including color themes such as purple, black and white, and pink. I thought a pink, purple, and red would be fun to try for Valentine's Day.

I hit Dollar General and Just a $1 (luckily they are right next to each other here!) and found some really neat things. Everything you see in the photo was purchased at one of those stores (aside from the Dr. Pepper Lip Smacker, found that at Target). The kiddo picked out the bear, so I agreed to add it as his contribution to the bucket. :) Everything I bought are things that I know the recipient will like. I simply kept an eye out for the colors I had in mind.

Here are some other items to consider:
Nail polish
Nail files
Big Red Gum
Cherry Sours
Wild Berry Lifesavers
Small box of chocolate hearts
Colorful Jewelry
Flowers
Wine
Trinkets
Reese's Candy
Small Balloons
Pens, Pencils, Markers
Stickers (for teachers or scrapbookers)
Key chains
Shampoos and Conditioners
Bath salts, beads, bubbles
Candles
Books
Flower seeds

The list can go on and on really. Hopefully I have helped give a few ideas. :)
Have a Happy Valentine's Day!

Friday, January 17, 2014

Patriotic Buddy Poppy Wreath for Veteran's Day

Patriotic DIY Buddy Poppy Wreath
Due to the chaos/mess of the holidays, I didn't get this posted when I wanted. My soon-to-be sister-in-law asked for my help decorating the the local VFW's float for the Veteran's Day parade. I wish I can could claim the idea on this one but it was all hers. And it turned out to be a good one!
VFW Buddy Poppies
She was given a full box of Buddy Poppies to play with. And that we did. We pulled the tags off each one and left the wire stem. Then we simply stuck the stem into the foam wreath. She wanted red, white, and blue theme colors, so we attached a white and blue deco mesh bow to the bottom to take the Christmas-y look away from it.

Aside from the poppies blending together too much, I say it turned out cute! She was very pleased with the results. And here is one on the float! 
buddy poppy wreath on float

We had a lot of trouble finding the foam wreaths. At the time, they were out of stock everywhere. I wanted to get a larger one but we went with what we had. We also painted the signs with silver, red, and blue. We worked HARD on those! But I really have to give all the credit to my sister-in-law-to-be.  :)


Tuesday, January 14, 2014

Silent Hill Mandarin Cosplay

Silent Hill Mandarin Cosplay

So this is half  year late, but I just love this photo I took at A-kon 24 in 2013. She won a well-deserved award in the cosplay competition. Hopefully I will get more A-kon photo posts here. I used to have a photo gallery many ages ago. Not sure where it's floating on the great wild world of the interwebs, LOL. 

Parenting done right! Kiddo Mega Man Cosplay.

Kids Mega Man Cosplay

My kiddo made me proud when he asked to be Mega Man for his cosplay debut at his first comic con last year. Needless to say, we had to make something that he would be proud of as well. He got lots of fan love and also won Honorable Mention in the children's costume contest. And he loved every moment of it!


HELMET: This was by far the easiest part. It was also the reason and the base of the entire costume. I bought it for him this past Summer at A-kon 24. Here it is on Amazon. I just took that bad boy to the fabric store and found some matches.

JUMPSUIT: I used one of his long sleeve t-shirts, some pajama pants, and a pair of his shorts to to trace patterns and sewed those myself. For the shorts, I just used a slim piece of elastic I had laying around for the waistband. The best thing about the shirt: it doubled as a great long sleeve top for his Adventure Time Fin costume for Halloween.
That's him with the same shirt attacking his step-daddy :P

BOOTS: This was our first attempt using EVA foam. It consisted of 2 pieces (which were not attached, had so much trouble with it!), then I hot glued the fabric over them. The bottoms were left open, so the boots are simply covers that we slipped over his tennis shoes. I had attached an extra wide strap of elastic across the bottoms to keep them in place. It was just a lot of trial and error. Not sure if EVA foam was the best option for them, but they turned out great anyway.

The only complaint the kiddo had about the entire costume was that the boots were too difficult to walk in. He tripped in them once and that was the main reason he didn't want to wear this for Halloween.


MEGA BLASTER: We made the barrel out of EVA foam as well, then my husband added some LED light components he found at Radio Shack because, well come on, it HAS to be able to light up! It also had a handle inside of it made from a pen casing and there was a button attached so the kiddo could trigger the light himself.

The red fixture on the end was used from a few plastic things found in our dish cabinet. One of them was a lid from a Rubbermaid Twist & Seal container (pictured below) that I used for the kiddo's lunchbox. They were bought at Target. It was used as the base on the end to cover and protect the LEDs. The other red piece was some kind of red plastic circle we had in our lid drawer :S  Not sure what it went to but we found a purpose!
My husband left it at that but it needed a gauge or it was just unfinished to me! So I simply cut out a piece of yellow craft foam and used a ruler and a sharpie to draw straight lines on it, then simply hot glued it on.


And he was very proud of it! 


Friday, November 1, 2013

Trick-or-Treat Candy Exchange for my Kiddo with Food Allergies.


For me, the true terror of Halloween was my peanut and tree nut anaphylactic child trick-or-treating. Or coming home from school with party treat bags full of potentially dangerous candy. So many bad scenarios swam through my head, too many to list without going into a Mommy rant. But with some education and research, and a few years experience under our belts, the Kiddo and I now have a successful bartering system for Halloween candies and treats (as well as Christmas, Easter, Valentine's, birthday parties, etc.).

First and foremost, ALWAYS READ THE LABELS. I can't stress that enough. Even if it has been eaten before, manufacturing processes change often. What is shown in the PASSED section above has been approved by me for my child only. So please do not rely on what is shown as proven to be safe for your allergic child. The best thing for you to do is read the labels on everything, every time. The only purpose for posting the PASSED photo is to show that he can enjoy many other things compared to what he cannot have.

My Kiddo is blessed with a lot of family that loves and watches out for him. So majority of the candy he receives have already been pre-checked and approved. As for the trick-or-treating candies and treat bags he brings home from school, he knows he is not allowed to eat any of it until he gets home and we check it together. This is not a problem because he knows he'd rather be safe than sorry. He remembers past allergic reactions and is well aware of the consequences. Plus he gets very excited to see what I have to trade for his unsafe goodies.

FAILED
Anything that does not have an ingredients label is automatically rejected. My husband and I usually have the laptop out and looking at candy manufacturer's websites to read up in their allergen policies. Many of them have very useful information and take the subject matter very seriously, like Hershey. Notice the taffy in the "Failed" section. No label, no good. Also, the Little Debbie Oatmeal cookie is a no no. From my experience, almost all of them may contain nuts. The popcorn balls had a warning that said "Manufactured on the same equipment as other peanut products."

Mommy's Exchange Bucket!
I usually try to stock up on inexpensive seasonal party toys, pencils, stickers, bouncy balls, tattoos, and even toss in loose coins and some dollar bills. Top that with some of his favorite candies (pre-approved and label read by Mom herself) and he has a treasure box of fun things he can't wait to trade for. We have fun dumping out all his stuff and seeing what he has collected. I separate the "good" candy and the "bad" candy into two different piles. Then, WE MAKE DEALS! And Mommy gets to stash away the Reese's at work for rainy days. :P


Tuesday, October 29, 2013

"Baby" Halloween Pumpkin Idea for Daycare or Nursery.


A friend/co-worker's church put together a pumpkin patch this year and since I have never been to one (and to help them raise money), the kiddo and I made a trip last Friday to have some Fall fun!

I have been dying to make the "Baby" pumpkin for my Mom ever since I saw this on Pinterest. She doesn't get the chance to decorate much anymore and I thought this would be perfect for her daycare. She loved it! I think I may try it with a fake pumpkin so she will have one to set out every year.

The smallest pumpkin pictured was my kiddo's work and insisted it stayed in the picture. He was giddy about the tiny pumpkins and wanted to stick his purple vampire teeth in one. To give him "mean" eyes,  I let him use some red glitter glue I had laying around forever.

Monday, October 14, 2013

Creepy Halloween Skull Tray Tabletop Decor


So here is my real fake fruit bowl. Yay. Displayed all-year round on my buffet in my dinning area.  I have two chargers on top of a glass bowl. The bowl is pretty in itself, thinking of just making it a stand alone after Halloween.


I needed something new for the buffet this Halloween and I wanted to still use the two chargers. It needed to be creepy and somewhat disgusting (but not bloody disgusting! For the kiddo.) I didn't want to spend any money, so I dug around for some random bits from my treasure boxes in storage. The skulls were perfect! Kept the Autumn fruit from the bowl and the rat adds a nice touch (of plague!) Leaves are always falling off my fake vines and I am too lazy to stick them back on, so used them for garnish instead. Then added some spider webs .

I had fun editing and playing around with the photos for some creepy effects!


Tuesday, September 24, 2013

DIY Hello Kitty Key Cover


I was told that I needed to blog more, so here is a quickie :P

We bought a used Durango last December and the one and only key didn't have a ring/clasp and the buttons were missing. That's my luck. But the vehicle had AC and living in 100+ degree weather 8 months out of the year (exaggeration) I didn't much care about the condition of the key. 

My husband globbed some kind of industrial glue to the back of it and stuck a ring on it because he liked it I guess (see what I did there.) It lasted for a few months, then the glue started to crack and then the ring fell off. So here I am trying to keep up with a loose key along with my other keys! And I am the type of person that is always losing my keys. So it's a pain in the butt but I still kept putting off a fix. Until I nearly dropped the stupid thing down a storm drain the other day! So it was time to do something, so I made my own case in a very small amount of time while sitting next to my kiddo while he played on the Xbox.

So here it is. Dang that thing is a big piece o'crap.


And here are the materials I scrounged up:


First thing I did was made the tiniest, tiniest hole in the center of the felt square:

Now trim a little itty-bitty snippet off that corner to make your key slot.


I trimmed a little bit off felt off the sides and top of the flaps and stitched them together.


For Hello Kitty's Face, I cut out an oval from white scrap felt. Then I cut out a bow and then hot glued them to the case. If you can tell from the first picture, I also hot glued two strips of felt the the sides of the case for reinforcement and to cover up my crappy stitching job. Then I took a fine point sharpie and drew the face. and TA-DA! The felt may be a weak fabric to use, but it will hold me over for now. 

Friday, June 29, 2012

Canada Day Cupcakes with FREE Printable Flag Template.

Canada Day Cupcakes
Since my sweet hubby will have to celebrate Canada Day here in the States, I decided to have some festivities this coming Sunday to put a smile on his face :) We will be having my family over for lunch anyway so I figured, "Can't go wrong with cupcakes!"

I have so many ideas in mind: red velvet to cream stuffed or swirly red and white icing ideas...but I also have a budget and limited time. And the husband doesn't have a broad taste palet so I decided to go with simple chocolate chips cupcakes with red/white icing topped with Canadian Flags on toothpicks. I Google-searched high and low looking for free printable Canadian Flags but ended up with nothing. So I said it would be quicker to make them myself. And since I didn't find any fairly quick, I am posting them here to share!
Printable Canadian Flag template Cupcake Toppers
**UPDATE** LINK HAS BEEN CORRECTED 7/4/2017
Click HERE to get the FREE printable template for Canada Day Cupcake Flag. Once there, just right click and save!
 (if any troubles with DL, let me know. I may have to tweak it later but for now this will do :)

Unfortunately, my printer wanted to run out of ink and so some of the flags are "Off-color." I say that because I don't' want to call them pink :p


Cupcake Flag Instruction instructions after printing the template above:

 1.) Cut down white line in center of the page.

2.) Then cut out the strips of flags. DON'T cut out each individual flag. You want two flags connected to each other. You will have 14 double flags in all.


3.) See that massive red block awkward block in the middle of the connected flags? That's where you want to fold it in half. Apply glue to back of paper, then wrap it around your toothpick. I made sure the ends opposite of the toothpick lines up, then smooshed the rest together to make it even.


The above pic is the result! Super cute!

Hope it helps! They were super easy and fun to make, decorate with, and enjoy for day!

Tuesday, June 12, 2012

Assassination City Roller Derby Demo at A-kon 23 - Dallas, TX.

A-kon 23 was just as crazy as ever! So many people, it's insane. Glad it's moving to a larger hotel and convention center next year (Hilton Anatole, hope you can handle the chaos that will be A-KON 24).

My favorite event of this year's con was the Roller Derby Demo that was held Friday night. Several bad ass ladies from Assassination City Roller Derby came out to the Sheraton and demonstrated some derby basics and maneuvers. And we were privy to learn a little bit about each skater :) They really are an awesome group of women!


It was good fun and got to see some derby at A-kon. I didn't get the best of snapshots (FAILURE!), but you can view more at Flickr.

Wednesday, May 30, 2012

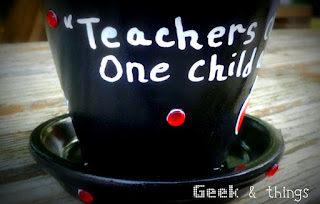
DIY Version of a "Little Pot for Thought" Teacher Gift


My kiddo has had a wonderful teacher this year. He has taught my son so many great things and showed compassion, concern, knowledge, and awareness about his food allergies. We wanted to show our appreciation with a thoughtful little gift to present to him at the End of the Year Classroom party.

I racked my brain on what to give him. I reached out to friends and google searched like crazy. Received a lot of great ideas, but I kept going back to this "Little Pot for Thought." It was just so cute! And the quote was perfect!


"Teachers change the world, one child at a time"  --Anon.
Well, if you clicked the link then I am sure you might have seen the price. It's a bit out of my budget and that doesn't include shipping charges. I was also on a very short time frame so I did not have time to wait. I thought, "That would be so nice stuffed with school supplies. And the pot would be so easy to make." That sealed the deal. So I went out and bought the supplies.


- COSTS -
Found the 4" pot terra cotta pot at Wal-mart for .78 cents. The matching saucer was .75 cents (why they charge separate for those is beyond me!) I went with Krylon Duo Paint + Primer in one, a glossy black, which cost 4.94.  We needed a mismatch box of acrylic gems anyway, and we found one that had little red ones just like the "little pot for thought." That cost $4.97. Then I purchased a white paint pen at Hobby Lobby for $2+change along with a 40% off coupon. I should have bought a smaller tipped paint pen, I was a total noob at it and the letters turned out HUGE. But anyway, I already had the rest of the materials, so it cost me less than $14. Even lesser if you figure the cost of the actual gems used. I had money left over to buy some supplies I knew he used for fillers: pencils, dry erase markers, red pens, and some post-it notes. The kiddo also wanted to leave a little something extra special in there for his teacher, so he tucked in a Spring school photo of himself.


Here is a close-up of the acrylic gemstones. Tacky Glue hadn't completely dried yet, so you can see a bit of white around the edges.


I added a little bit of personal touch by writing his teacher's name on the top rim. The kiddo also signed the back of the pot with a drawing of a heart with love (not pictured). Children can be so sweet. :)


- TIPS -
I used a fine sand paper to smooth out sharp and rough edges of the terra cotta pot before I painted it. I also used tacky glue for the acrylic gems, E6000 to permanently glue the pot and the bottom dish together, an apple sticker for decoration, and then sprayed the finished project with Mod Podge spray sealant. I recommend the glossy sealant if you are using the gloss spray paint.